Week 7 - Decorations

I spent this week creating some of the larger scale meshes I will use to decorate the environment with the intent to texture them next week. I used a mixture of sculpting, modelling and photogrammetry to generate these assets. I also experimented with using alternative software such as MeshLab and Instant Mesh to streamline my retopology process with these assets. Finally I created a simple spline tool to allow for me to procedurally generate chains and ropes within Unreal engine 4

Procedural rope and chain in UE4.


Cacpcom license a line of small statues of monsters from the Monster Hunter series, I decided to capture these statues to generate base organic forms of complex monster designs I could then sculpt into to the mesh to achieve a high level of visual fidelity. In previous modules where I have used photogrammetry, I have simply created an exact copy of the subject matter, with this I want to try and transform the output into something more cohesive within a game environment and repurpose the subject.


Traditionally I have retopologized high-poly meshes manually in Maya using the quad-draw tool. However, this is a slow way of handling retopology especially with respect to more complex assets forms. With this in mind, I decided to investigate other software suits and test their effectiveness in my pipeline. The first tool I experimented with was MeshLab(http://www.meshlab.net/), an open-source mesh processing software, the suite of tools is rather robust and impressively effective. However, I found MeshLab to be very unstable and documentation was lacklustre leaving me to wonder through forums. For example, when exporting a mesh as a .obj certain setting, what can be switched on by default, will simply cause the entire program to crash. Certain functions can also cause MeshLab to crash if performed when the asset is visible. Once you learn about these you can navigate around them but they represent the rough nature of the software. Despite this, the results are impressive, the software's Quadric Edge Collapse, does a great job of preserving the assets form and gives me a good amount of control for an automated tool and handles incredibly high poly geometry with seeming ease. Unfortunately, it does triangulate the mesh and converting it back to quads is not easy to do. This makes the asset harder in some ways to work with afterwards if I need to and creating UV seams slower.

Screenshot of original(right) and retopologized (left) asset, as well as face and vertices counts (underneath).

Instant Meshes(https://github.com/wjakob/instant-meshes) is a program from a SIGGRAPH paper on automatic retopology broadly it works similarly to Zremeasher within Zbrush and like Zremesher produces primarily quadded geometry. The process is divided up into 3 different stages: Orientation field generation, position field generation and mesh generation. Throughout each step, there are a number of tools to help improve the results but I found that the results from using these were mixed. While a quaded output was valuable I struggled to maintain a good form while using it and it doesn't hold many advantages over Zremesher especially when combined with the other tools you can use within in Zbrush to touch up the results.

Retopologized asset withing Instant Meshes.


Week 6 - Textures

This week I've dedicated to creating materials to use when texturing my assets. My goal with these textures is to try and make them as reusable as possible so I can focus my time. I aim to texture many of my assets with trim sheets and tillable textures to allow for more effective iteration off them and to save on memory. 

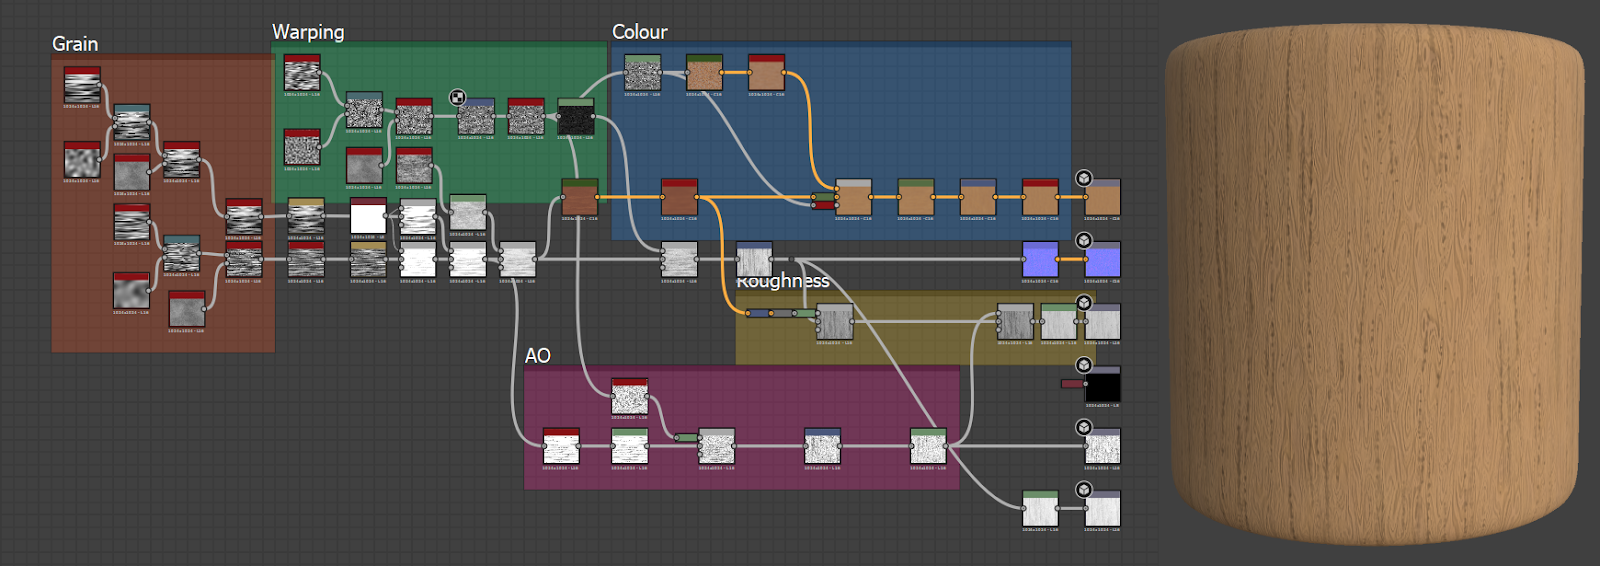
Bare Wood material.
Bark material.
Bone material.
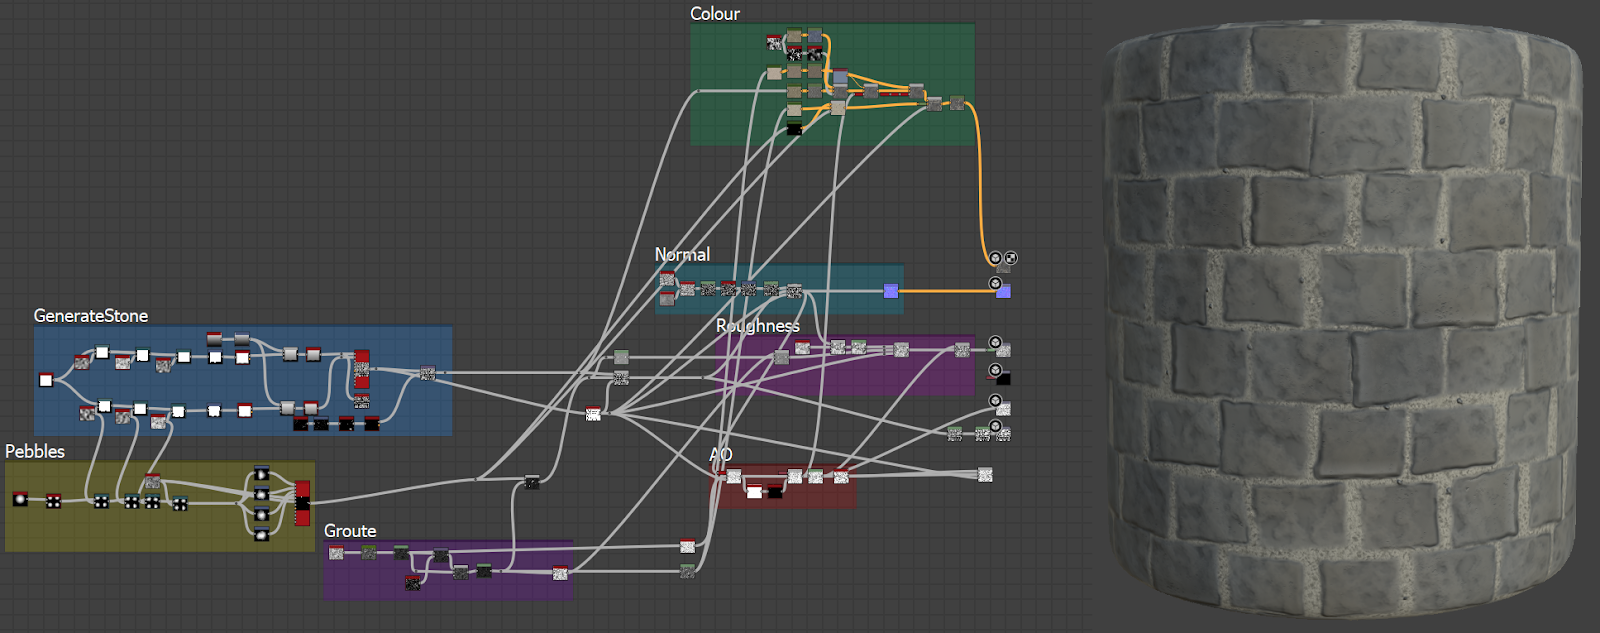
Stone brick material.
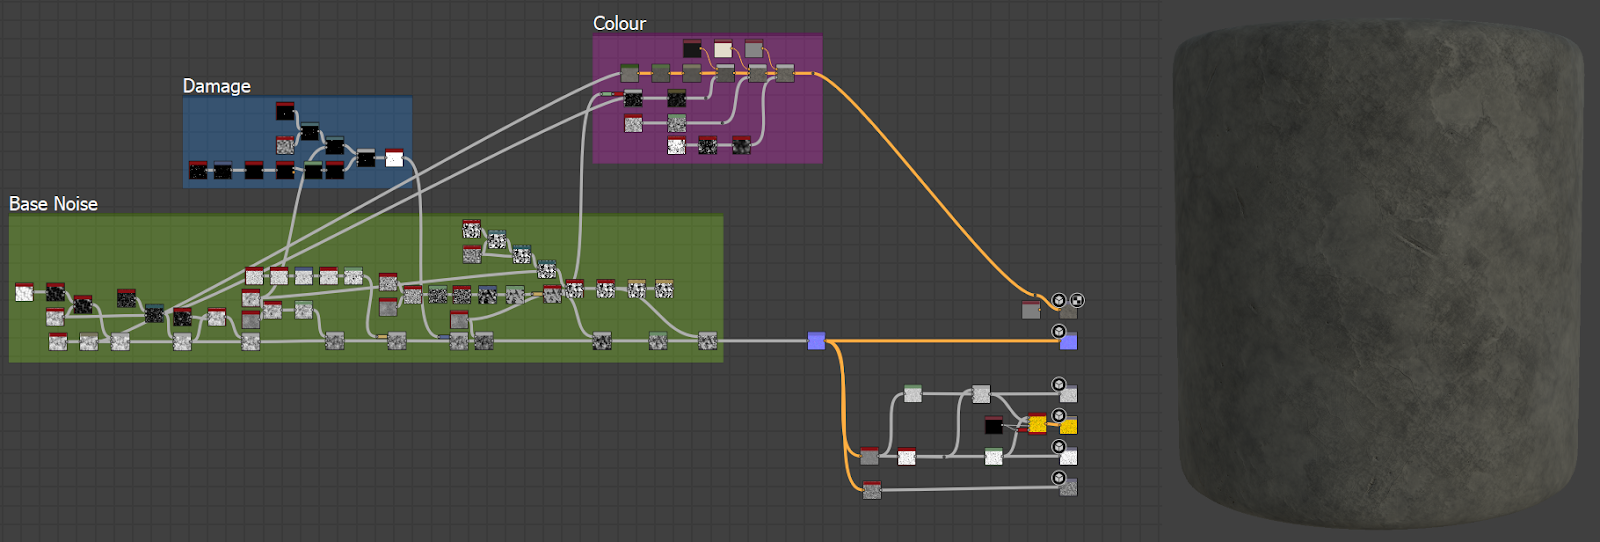
Rock material.

My primary tool for generating materials has been Substance Designer, I've had previous experience with Designer but that has mostly been for stylized work so this has pushed me. I want these materials to be very tileable so I've had to walk a fine line between high detail and keep the texture generic enough to not look obvious when tiled. due to the difference between how these materials look within Designers Iray render compared to Unreal 4s rendered I have had to make adjustments to them once I hate them within Unreal 4.

A wood material using layered tileable textures(left) compared to a zero to one wood material(right). Both materials texture sets are the same resolution but the tiled holds up much better under scrutiny.


To compliment my Substance Designer work I have begun developing more complex materials within Unreal 4 that layer tiled textures on top of each other to achieve better results, this does have an impact on performance compared to a standard zero to one texture set. However, I feel the visual quality enhancement are worth the trade-off as it allows me to achieve a much higher resolution than I otherwise could. Though to help alleviate some of the performance cost I have tried to build these materials for trim sheets so they can service multiple assets with just one draw call. This approach will not be appropriate for every asset so I will still be using zero to one texture for assets like the weapon stand.

Week 5 - Interior Additions

This week I began thinking more in-depth about what I want to achieve with the lighting and how I am going to do it. One of the biggest problems I have had with lighting it parts of the environment being almost completely dark so I began looking at ways to address this. First I tried using global illumination to brighten the scene as a whole, I am reasonably sure that global illumination is a vital part of how Monster Hunter: Worlds environments are lit. It was effective but introduced new problems, predominantly it left the environment feeling washed out. Another method I attempted was to have an overhead light that was cast light across the whole scene, this overpowered the environment and drowned out all other light sources no matter how I tried to balance it.

screenshots from various iterations on the lighting.
While there is still work to be done I feel the lighting is moving in the right direction, I've used the exposure settings inside the post-processing volume to brighten the scene up. I have also tried to draw a clear divide between the inside and the outside with interior lights leaning into warm yellows and oranges and exterior lights using colder blues and whites, in the same vein I also changed the skylight to imply a night time setting. I am unsure if I want to brighten the scene any further so I plan to seek out second opinions on the current lighting. I believe my next steps in the meantime will be to work on the colour balance and to experiment with LUT tables.

Current lighting set-up

Week 4 - Inital Asset Creation Continued

Over the course of this week I have continued to work on asset creation, texturing the walls I started last week. The building is assembled from several different sizes of wall assets to allow for a more interesting layout. To keep the scene optimized I want to be economic with my texture use where possible during this project, in that vein, all of my wall assets are fully textured with just 3 materials instances. To achieve this without sacrificing texture fidelity the UV shells were stacked on top of each other in the UV map. However, this does mean that each element is textured identically leading to some repetition.  I think this could be crunched down further but I am concerned about the walls becoming overly repetitious as a result. 

Various wall assets rendered in the engine.
Alongside the walls assets, I also generated a couple of assets for inside the building these assets were the hammock, steps and bookcase. These were assets I knew I wanted in the scene but I did not estimate to be too time-consuming so they fitted well into my schedule for this week. Just like with the walls the steps UV shells were stacked on top of each other, due to the shape of the shells this left about half the UV map empty. I looked at a couple of options and elected to unwrap the metal elements of the hammock onto the second half of the UV map, again to minimize texture usage. The hammocks cloth takes advantage of Unreal Engine 4s cloth simulation. This did require the cloth be assigned as a separate element to the rest of the mesh and that the asset be imported as a "Skeletal Mesh" instead of the "Static Mesh" that all my assets had been up till now. For texturing the hammock I also created a rope material within Substance Designer for the cord, I intend to use this material later on as well.

 Graph and render of the rope material in Substance Designer.
 Satish  Shewhorak raised concerns with the roof of my building, felling it inappropriate for the style of building and positing it gave off a naval vibe. After talking with him about it during our Tuesday session I came to agree with him and looked into an alternative roof. I settled on extending the existing roof up to a point and filling the new cavity with a giant skull of a monster as a type of trophy. This feels thematically consistent and more visually interesting, though it does require alterations be made to my schedule to accommodate the new work. my original roof piece was designed to allow in as much light as possible to help keep the environment bright what now won't be possible. I've considered using another element from the game to help alleviate this, "scoutflies". Scoutflies mechanically serve as a guide for players in-game and are thematically a breed of insect similar in nature to fireflies. Chiefly they let off a noteworthy amount of light and are kept by players. My plan is to experiment with using the skull as a host for a scoutfly nest to have coloured light emanating from above the room. This could prove better lighting as it'll allow me to mix more colours into the environment.

Original roof design.
New roof design.

Week 3 - Initial Asset Creation

This week I was wholly focused on asset creation and texturing, mainly the walls, floors and roof assets. I aimed to have the floor and roof assets completed an in-engine by the end of this week and the wall assets fully modelled in low and high poly and UV unwrapped, with just texturing and engine implementation remaining. One of the biggest challenges I faced while texturing was maintaining something that looked good and in-line with Monster Hunter Worlds aesthetic. I adjusted the textures numerous times as I compared them within Unreal Engine 4. I am not wholly content with the art style of Monster Hunter: World, in particular, its roughness maps are general pushed very far to the white and lack nuance so I may experiment going forward with pushing worlds aesthetic in different directions.


Curved roof assets, sculpted in Zbrush, retopologized in Maya and textured in Substance Painter.
The flooring assets.

Several of the wall assets, sculpted in Zbrush, retopologized in Maya.

I intend to work within Substance Designer substantially this module, this week I created two materials within Substance Designer. A mud material for use on the terrain and a wood material for texturing assets. I tried to cross-reference between screenshots of Monster Hunter: World and photos of the type of material I was aiming for what proved to be quite challenging overall.


Mud material created in Substance Designer.

Wooden material created in Substance Designer.

Week 2 - Blockout and Proposal

My primary focus this week was on finalizing and submitting my proposal by the deadline. I made some last-minute adjustments to its content based on feedback from my supervisor, but largely my project goals have not changed. I also polished the formating and aesthetic elements to make the document more readable and visually appealing.

With my preliminary research and sketches done I began blocking out the layout within Unreal Engine 4. Even with most of the design figured out in advance I still made adjustments once in the engine as I began to get a better feeling for the scale of the environment. One of the main things I wanted to consider as I did this was how the structure would actually be assembled both literally in terms of the assets I would use and thematically for the type of structures I am referencing. Once blocked out with basic shapes I exported them into Maya to create assets more indicative of what I wanted the final design to be. I then began to consider what form the exterior elements would take.

Outside shot of environment blockout
Outside shot of a second iteration of the environment blockout
Outside shot of a third iteration of the environment blockout 

While It is too early to start getting deep into lighting I do want to consider how the scene will be lit and what I want to achieve with that lighting regardless.  Monster Hunter: Worlds environments are predominantly lit with "natural lighting" what I intend to emulate to the best of my ability. However, these areas need to be lit to a degree in which a player could navigate them comfortably.

Interior shot of environment blockout with basic lighting, likely to dark at this point.

I have been experimenting inside World Machine, looking at real-world references I iterated on several different types of terrain. Right now I am looking at terrain for the building to be set in but later in the project, I hope to use in the far distance to create a better sense of place.     

Week 1 - Research and Planning


Over the course of this module, I aim to create a detailed environment based on Monster Hunter: World. in particular, I want to draw inspiration from the player housing within Monster Hunter: World and it's expansion Icebrone to develop a mostly interior environment that could believably be a new player housing option, possibly as part of a second expansion. I will detail the progress of my work on this project here regularly until hand-in at the start of May.

With my goal in mind, the starting point for my research was Monster Hunter and similar environments within other games. I didn't want to limit my research to just game environments so I also researched into real-world decor and environments that I felt were potential influences for Monster Hunter or which could act as new influences for me to help this project stand out from the interiors already in the game. As part of this research, I collected reference images to assemble into mood boards. I ran these mood boards through the mosaic filter in Photoshop to help get an indication of the colour pallets I should be looking at.

Mood boards compiled from research.
Mosaic of mood boards to help identify colour palettes.

I also used the mood boards to begin sketching out early concepts for the environment. I made this choice as producing these sketches is faster than a full block-out within Maya or Unreal 4 allowing me to brainstorm a wider variety of ideas at this early stage. In particular, I wanted to consider the room layout and how the structure integrated into the environment. After this, I will start blocking out in Unreal 4 where I can finalize scale and settle on a more definitive asset list for the project.


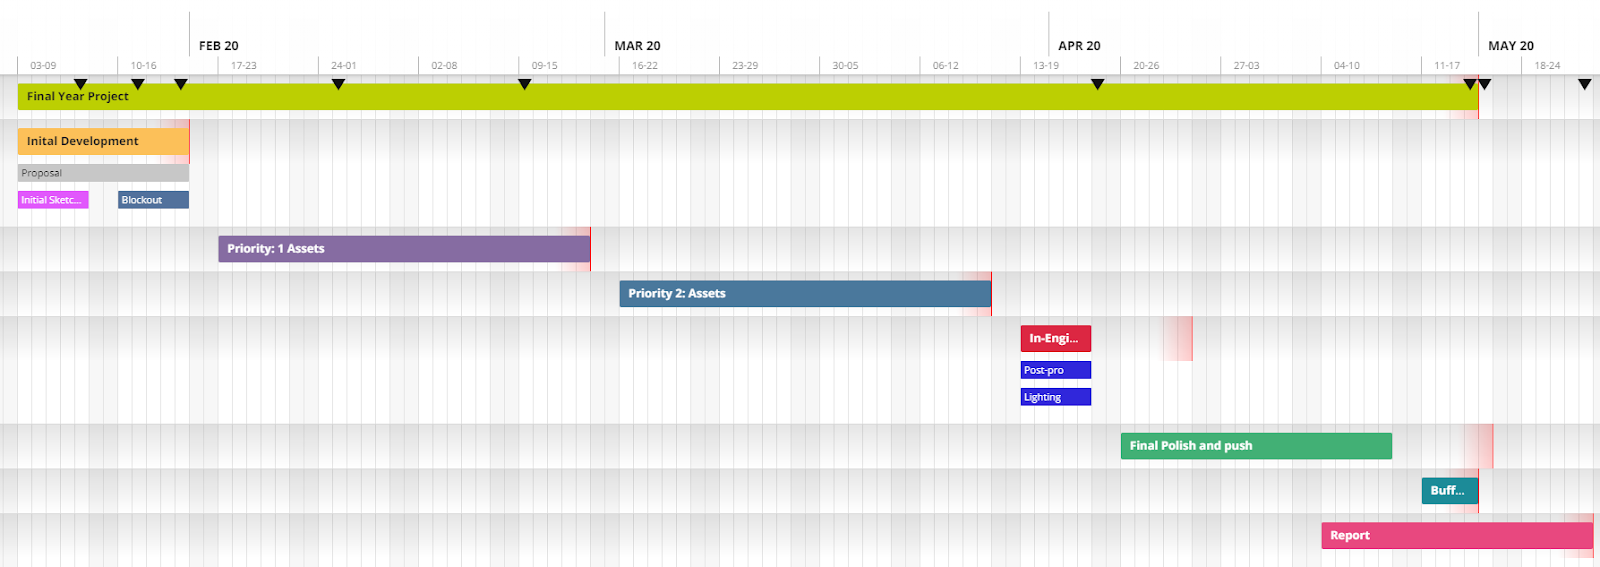
Time management on this project will be crucial due to the ambitious nature of it, I primarily use spreadsheets to track work that needs completion and Gantt charts to visualize the time frame for this work and help identify if it is feasible. I also plan to use the MoSCoW method of prioritization to divided up and schedule the work so that I'm not rushing to complete vital work in the final weeks. This approach has proven successful for me in both individual and group projects previously so I'm confident in it for this project. Currently, my plans are both broad and subject to change as I haven't settled on much of the project's content at this stage. These plans will be refined in the near future and I hope to have a firm idea of my most important assets early next week. However, regardless they will be iterated on throughout the project as I adapt to feedback and roadblocks I may encounter.

Project Gantt chart

Speculative Asset list